

 PostGIS in Action
About the Authors
Consulting
PostGIS in Action
About the Authors
Consulting
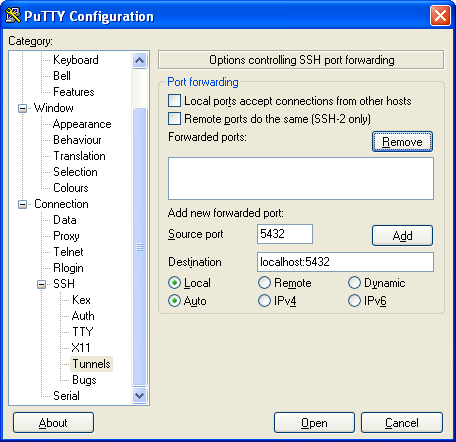
Monday, March 24. 2008PuTTY for SSH Tunneling to PostgreSQL ServerPrinter FriendlyWhat is PuTTYPuTTY was developed by Simon Tatham and is a very common light-weight MIT-Licensed free and open source Secure Shell (SSH) client for connecting to Linux/Unix systems via a Teletype (TTY) terminal emulation mode console. Currently there are ports for Microsoft Windows, other unix like systems, and ports in progress for Mac OSX and Symbian mobile phone OS. PuTTY fits into that class of tools we affectionately call Swiss Army Knives because it is Light, Multi-Purpose, and Good Enough. As an added benefit it is free and open source with a generous license so it is commonly embedded in commercial apps. PuTTY comes in handy both as an SSH terminal console and as a SSH Tunneling tool which allows you for example to use PgAdmin III from a local windows workstation against a remote PostgreSQL server even in cases where the linux/unix PostgreSQL pg_hba.conf and postgresql.conf file only allow local connections or non-SSH traffic is blocked by firewall. For more about the nuances of configuring the pg_hba.conf PostgreSQL server file that controls user access check out Hubert Lubaczewski's “FATAL: Ident authentication failed”, or how cool ideas get bad usage schemas http://www.depesz.com/index.php/2007/10/04/ident/ In this article we shall cover how to use PuTTY's SSH Tunneling feature to access a remote PostgreSQL server that doesn't allow remote connections. To make it a little more interesting we shall demonstrate how to do this for PgAdmin III. SSH Tunneling and why you might need itFirst off we'd like to say the command-line tool psql that also comes with PostgreSQL is nice and has its charm. It is simple enough that it can be run from an SSH console without tunneling so not much need for SSH Tunneling here. Unfortunately psql is scary to beginning PostgreSQL users, and also requires you have a fair number of SQL commands memorized to make the most use of it. PSQL also requires some typing which is annoying for many general use cases. It is ideal for scripting things and so forth, but it just is not a GUI app and was not designed to be. This is where the PgAdmin III tool fits the bill. PgAdmin III comes packaged with PostgreSQL but can also be installed separately. Now how do you use PgAdmin III when all you have is shell access to your server box and all the PostgreSQL ports are blocked or pg_hba.conf is configured to not allow remote access? This is where SSH Tunneling comes in handy. What SSH Tunneling allows you to do is to tunnel all your traffic to the server thru your SSH connection. It is basically a Virtual Private Network (VPN) using SSH. The basic idea is you map local ports on your pc to remote service ports on the server. When you launch your SSH session, you can then connect with any application e.g. PgAdmin III, MS Access whatever to this remote port via the local port. Instead of specifying the remote server port when setting up your PgAdmin III or MS Access connection, you specify the ip as localhost and port as whatever port you configured to receive traffic via the Tunnel. Setting up SSH Tunneling with PuTTYIf you do not have PuTTY already, you can download it from http://www.chiark.greenend.org.uk/~sgtatham/putty/download.html. Windows users can download the respective putty.exe. Putty is fairly small and can even fit on a floppy. It is really sweet because it requires no installation - just click and run. Once downloaded, simply launch the putty.exe. Once launched, your screen will look something like this. 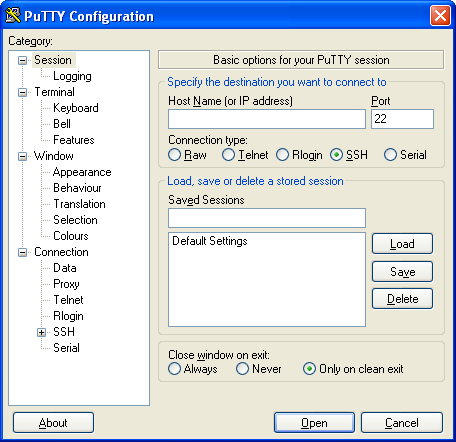
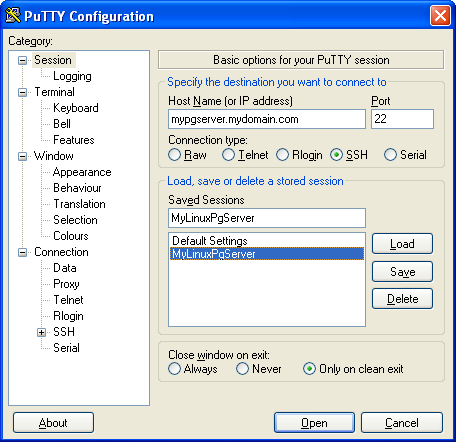
Now create a connection by following these steps:
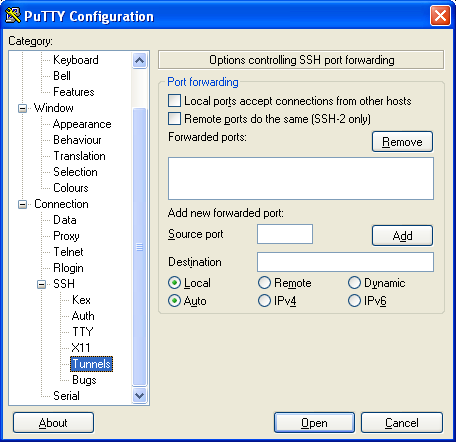
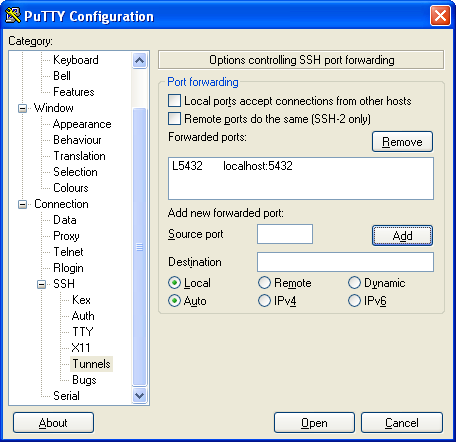
Now set the tunneling configuration
Once you do all of the above you and your Linux/Unix server is enabled with SSH support, you should get a black login console. Login as usual and just keep the console running. Connecting with PgAdmin IIIConnecting with PgAdmin III is now simple. The only trick is that instead of using the server's name and port, you specify the destination you chose instead. In the above we had chosen localhost:5432 so we setup a PgAdmin III connection with that as shown below. 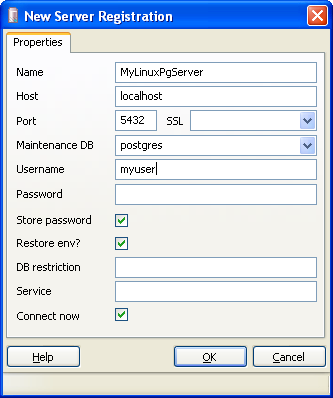
Comments
Display comments as
(Linear | Threaded)
Excellent article. However, you may want to add another example covering the extremely common case where a user doesn't have any direct access to the db server, i.e they can log in to their web server and that login can be set up to forward connections to the db server.
Did they every email you and show you how to create this link with a db server which doesn't have any direct access???
If so -can you forward me to the link??? thank you.
Just wanted to say that this is such a great product. I needed something exactly like this and it is very seldom that you find something on the web to fit your needs exactly.
Well done and thank you.
Excellent article. However, you may want to add another example covering the extremely common case where a user doesn't have any direct access to the db server, i.e they can log in to their web server and that login can be set up to forward connections to the db server.
Excellent post, right on target. Thank you. The only problem I have is with pgAdmin III itself which wants to administer the entire database cluster, and I wanted to grant access for a user to just a single database and table subset.
It so simple, but i can't. I get error in pg_log:
could not connect to Ident server at address "127.0.0.1", port 113 But I can connect from notebook with putty and command: vidas@vartai:~>psql -U admin db with no problems. My test pg_hba.conf: local db admin trust ... putties login name 'admin' too. username in pgAdmin 'admin' too.
Vidas,
Which computer are you trying to connect form? local is socket port not tcp/ip port. You should have one for host, localhost and I suspect you do, but its set to ident (which is standard for ubuntu as I recall). So its trying to authenticate admin using the ident server on your unix.
A really good article, its exactly what i need but i cant connect with putty.
I've installed freesshd and postgresql on machine server which run on windows server 2003. postgresql.conf is configure like this: listen_addresses = '*' and pg_hba like this: host all all 127.0.0.1/32 md5 host all all 0.0.0.0/0 md5 I want to access to postgresql from home. So, i installed putty and set like you described above with the hostname 'brasdours.no-ip.org' of my server. I configure the firewall on both machines to let the port 22 and 5432 open. And when i try to connect whith putty, it shows a message: connection refused I'll appriciate any help |
Entry's LinksQuicksearchCalendarCategories
SubscribeBlog Administration |


First we'd like to thank Devrim of Command Prompt for working hard on making this new YUM repository available. In this article we will go over using the new PostgreSQL YUM repository for Redhat Fedora, Enterprise Linux and CentOS distros that is availab
Tracked: Apr 24, 03:37
Tracked: Jul 15, 04:34
Tracked: Jul 15, 17:03