Table Of Contents
Starting PostgreSQL in windows without install Beginner
Explain Plans PostgreSQL 9.0 Text, JSON, XML, YAML - Part 1: You Choose Beginner
Using LTree to Represent and Query Hierarchy and Tree Structures Intermediate
PostgreSQL Q & A
Of Camels and People: Converting back and forth from Camel Case, Pascal Case to underscore lower case Beginner
When it comes to naming things in databases and languages, there are various common standards. For many languages the camel family of namings is very popular. For unix based databases usually UPPER or lower _ is the choice and for databases such as SQL Server and MySQL which allow you to name your columns with mixed casing but couldn't care less what case you express them in selects, you get a mish mush of styles depending on what camp the database user originated from.
So to summarize the key styles and the family of people
- camelCase : lastName - employed by SmallTalk, Java, Flex, C++ and various C derivative languages.
- Pascal Case: (a variant of Camel Case) -- LastName which is employed by C#, VB.NET, Pascal (and Delphi), and SQL Server (and some MySQL windows converts). Also often used for class names by languages that use standard camelCase for function names.
- lower case _ last_name : often found in C, a favorite among PostgreSQL database users. (some MySQL)
- upper case _ LAST_NAME : a favorite among Oracle Users (some MySQL Oracle defectors)
Being at the cross roads of all the above, we often have to deal with the various above as well as having internal schizophrenic strife and external fights. The internal turmoil is the worst and is worse than an ambidextrous person trying to figure out which hand to use in battle. For these exercises, we'll demonstrate one way how to convert between the various conventions. These are the first thoughts that came to our mind, so may not be the most elegant.
Converting from PostgreSQL common field names to camel case and others
For these exercises, lets pretend we have a table in PostgreSQL called people
CREATE TABLE people(person_id serial PRIMARY KEY,
    first_name varchar(75), last_name varchar(75));
Question: How do you convert from lower case _ to Pascal case?
Answer:-- pascal case
SELECT column_name, replace(initcap(replace(column_name, '_', ' ')), ' ', '') As pascal_case
FROM information_schema.columns
WHERE table_name = 'people';
column_name | pascal_case
------------+-------------
person_id | PersonId
first_name | FirstName
last_name | LastName
Question: How do you convert from lower case _ to camel case?
Answer:SELECT column_name, lower(substring(pascal_case,1,1)) || substring(pascal_case,2) As camel_case
FROM (
SELECT column_name, replace(initcap(replace(column_name, '_', ' ')), ' ', '') As pascal_case
FROM information_schema.columns
WHERE table_name = 'people' ) As foo;
column_name | camel_case
------------+------------
person_id | personId
first_name | firstName
last_name | lastName
Converting from PostgreSQL lower _ to Oracle upper _
Of course this one is trivial, but we include for completeness.
Answer:
-- PostgreSQL to Oracle
SELECT column_name, upper(column_name) As oracle_name
FROM information_schema.columns
WHERE table_name = 'people';


 column_name | oracle_name
-------------+-------------
 person_id   | PERSON_ID
 first_name  | FIRST_NAME
 last_name   | LAST_NAME
Converting from camel case and pascal case to lowercase underscore
Of course you often have the problem of some camel lover creating table columns in your database. You can fix this with SQL DDL hacks and PostgreSQL regular expressions.
 CREATE TABLE "People"("personId" serial PRIMARY KEY,
    "firstName" varchar(75), "lastName" varchar(75));
For converting the other way, using regular expressions (thank goodness PostgreSQL has this feature) seems to be the shortest way we can think to do this.
-- camel case to lower underscore

-- take all capital letters A-Z (we wrap a () so we can backreference
--  replace each capital with _ and original capital, g for greedy replace
-- then lower case it all
SELECT column_name,
    lower(regexp_replace(column_name, E'([A-Z])', E'\_\\1','g')) As regular_pgstyle
FROM information_schema.columns
WHERE table_name = 'People';


 column_name | regular_pgstyle
-------------+-----------------
 personId    | person_id
 firstName   | first_name
 lastName    | last_name
PostgreSQL Q & A
Starting PostgreSQL in windows without install Beginner
This is a question that comes up quite often by windows users, so thought we would share how we normally do it. The question is can you run a PostgreSQL server on your windows desktop/server box without having to install anything? The answer is yes and quite easily. Why would you need to do this. There are a couple of cases -- one you are developing a single user app that you want users to be able to run from anywhere without having to install it first. The other common reason is, you aren't allowed to install anything on a user's pc and you also want to package along a database you already have created.
For our purposes, many of our developers develop on portable WAMP like things, and for some of our applications, they need to work in both MySQL and PostgreSQL, so we need an easy way during development to swap one out for the other.
- Get binaries for Windows. You can either copy the postgresql folder (minus the data folder) from an existing PostgreSQL install, or just download the PostgreSQL binaries from PostgreSQL Windows. Make sure to choose the zip archive.
- Next copy the below batch file into the root of the postgresql folder
- For first time use, unremark out the (initdb step)
- Run the batch file
Below is the script that will start a PostgreSQL server and clicking the enter key will shut the service down. This is one we were using as part of a self-contained devleopment kit running PostgreSQL 9.0 beta. We chose to run on a non-standard port (5439 so we know its 9.0 server). To initialize the database for the first time, you will want to run the remarked out initdb line. You only need to run once. From then on you can carry the server on USB device if you want and launch as you wish. Clicking enter in the window will shut it down. The assumpution of the script is that its in the root of your unzipped PostgreSQL folder. The %CD% returns the folder path of current directory and %~dp0 returns folder path of script.
UPDATEAs Tom pointed out the original doesn't handle spaces and only works if you are double-clicking on the batch file. Better solution.
@ECHO ON
REM The script sets environment variables helpful for PostgreSQL
@SET PATH="%~dp0\bin";%PATH%
@SET PGDATA=%~dp0\data
@SET PGDATABASE=postgres
@SET PGUSER=postgres
@SET PGPORT=5439
@SET PGLOCALEDIR=%~dp0\share\locale
REM "%~dp0\bin\initdb" -U postgres -A trust
"%~dp0\bin\pg_ctl" -D "%~dp0/data" -l logfile start
ECHO "Click enter to stop"
pause
"%~dp0\bin\pg_ctl" -D "%~dp0/data" stop
Original script
@ECHO ON
REM The script sets environment variables helpful for PostgreSQL
@SET PATH="%CD%\bin";%PATH%
@SET PGDATA=%CD%\data
@SET PGDATABASE=postgres
@SET PGUSER=postgres
@SET PGPORT=5439
@SET PGLOCALEDIR=%CD%\share\locale
REM %CD%\bin\initdb -U postgres -A trust
%CD%\bin\pg_ctl -D %CD%/data -l logfile start
ECHO "Click enter to stop"
pause
%CD%\bin\pg_ctl -D %CD%/data stop
Basics
What is new in PgAdmin III 1.12.0 Beginner
Gathering from the number of hits we got from our What's new in PostgreSQL 9.0, and the large number of slashdot responses we got as well as the fair number of reddit responses, I guess a lot of people are really excited about the upcoming PostgreSQL 9.0 or at least have a lot of opinions about what is still missing in it.
For this discussion, we would like to point out one of the companion adminstration tools that will be packaged in with PostgreSQL 9.0 (and currently packaged in beta 2). This is PgAdmin III, which we will affectionately refer to as the Administrative tool for mere mortals. It is the first administrative tool that most users new to PostgreSQL use and gives them a user-friendly interface to the power behind PostgreSQL. I would say if it were not for this tool and its web cousin PhpPgAdmin, many a scared newbie user would be running away at the vast unencumbered freedom that PostgreSQL/psql and sibling commandline tools offer.
Yes I can hear the die-hard PostgreSQL super users screaming what about PSQL, PSQL is the coolest. Yes PSQL is cool and has new features too. I will say as far as commandline database tools go, PSQL, Pg_restore and Pg_Dump are the best we've ever seen packaged in a database product. MySQL and SQL Server should be ashamed of themselves for packaging comparitively much crappier commandline tools. We haven't used Oracle much so can't speak for Oracle tools. We'll get to PSQL and its commandline friends in another article. I will say though, that even if for whatever reason you can't upgrade to PostgreSQL 9.0 which many will not be able to because of backward compatibility reasons, you can still enjoy many of the new enhancements in PgAdmin III 1.12.0 and the new PSQL and related command line clients that will be packaged with PostgreSQL 9.0.
PhpPgAdmin is cool too. This is the web interface similar to phpMyAdmin and patterned after that except with bells and whistles specific to PostgreSQL (such as schemas, tablespaces, create types etc). We'll cover that in another article.
Okay what's new in PgAdmin III
All the new features in PgAdmin III 1.12.0 are outlined at PgAdmin III 1.12 Visual Tour. Here we'll give a run down of our favorites in priority.
- Support for PostgreSQL 9.0. You can't read 9.0 database with the older PgAdmin III's
- The new backup interface. It gives you so much power on what you can backup and compression and so forth. Since
we are writing a book, where we want to selectively include some tables and not others, this is especially nice.
Note that these features have been available in the pg_dump commandline for a while, but its really nice to have a graphical interface to those features
so you don't have to figure out how to write out those command line switches and paths. The objects tab is our favorite
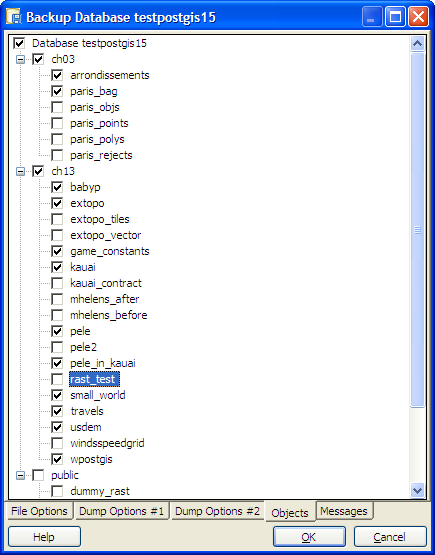 tab on backup.
- Restore options - this allows you to set the number of jobs and better interface for selecting what you want to restore. Its a bit tricky, so we'll show it in the next section of this article.
- Connection Handling - client losses connection to server you get the option to reconnect now.
- Support for new column level triggers
- Server groups -- ability to group registered PostgreSQL servers
- Ability to quickly save graphic explain plans as a PNG file.
- SQL Editor automatically remembers past run queries and allows you to toggle to them to rerun them
- Support for the new 9.0 extended priviledges (DEFAULT priviledges)
Selective Restore
For compressed backups and tars, you can selectively restore just like you can with the pg_restore commandline. Here are the steps.
- Select the backup file. You can set the number of parallel jobs you want to use for restore.
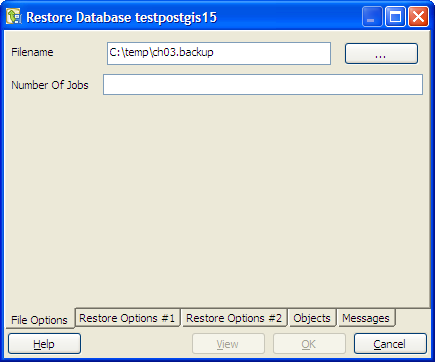
- Switch to the Objects tab.
 and click the View button.
 - Double-click on the backup file name and you should see all the schemas and if you expand a schema the objects in that schema
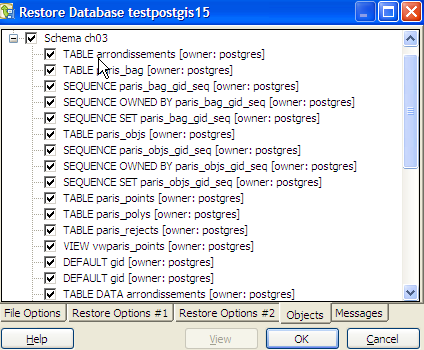
- Then selectively select (if you don't want to retore the whole thing) what you want to restore and click the OK button
Basics
Explain Plans PostgreSQL 9.0 Text, JSON, XML, YAML - Part 1: You Choose Beginner
One of the new features of PostgreSQL 9.0 is the ability to specify the format of an explain plan. In prior versions your only choice was text (and graphic explain with tools like PgAdmin III and other GUIS), but in 9.0 on, you have the additional options of Javascript Object Notation (JSON) which some people have a thing or two to say about them, YAML Ain't Markup Language (YAML) or eXtended Markup Language (XML). The new explain options are itemized in PostgreSQL 9.0 EXPLAIN.
The main benefit of the JSON, XML, YAML formats is that they are easier to machine parse than the default text version. This will allow for creative renderings of planner trees with minimal coding.
In Part 1 of this series, we'll demonstrate how to output the plans in these various formats and what they look like. In later parts of this series -- we'll demonstrate how to use Javascript, XSL and other scripting/markup languages to transform these into works of art you can hang on your wall.
-- START POSTGIS IN ACTION ASIDE --We just submitted the third major revision of Chapter 3 Data Modeling of our upcoming PostGIS in Action book. The second major revision we never submitted and threw it out because it wasn't worldly enough and was too involved. We may use it later on for an example. Chapter 3 should be up on Manning Early Access Program (MEAP) soon. If you haven't bought the book yet Buy now. You don't want to miss out on a major masterpiece in the making. Okay we exaggerate a bit.
-- END POSTGIS IN ACTION ASIDE --One of the benefits of slaving away trying to create real world data examples, is that then you can use them to demonstrate totally unrelated topics, such as doing artistic things with EXPLAIN PLANS. In our explain plan, we'll be using example data from this chapter 3.
Explaining the Query
For those who are not familiar with explain plans, explain plans are in a nutshell a description of how a database planner is strategizing how to complete a query. They look like trees because the master plan usually involves subplans. Any database worth its weight has such a thing though they may go by slightly different name - PostgreSQL, SQL Server, IBM DB2, Oracle, MySQL, Firebird, etc. PostgreSQL's flavor of it is fairly detailed as far as databases go.
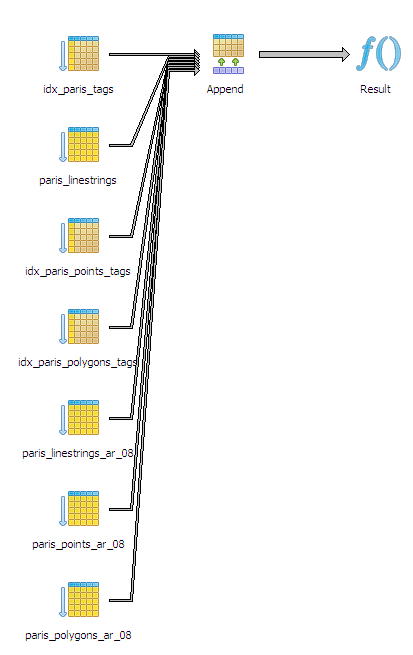
In these examples, we will demonstrate an explain plan involving inherited tables as well as using hstore columns and indexes on those. The plan as you can see forms a tree.
The familiar plain text Explain Plan
-- PLAIN TEXT --
EXPLAIN ANALYZE
SELECT feature_name, tags->'tourism' As tourism_type FROM ch03.paris
    WHERE ar_num = 8 AND tags?'tourism';
Result  (cost=0.00..50.13 rows=7 width=405) (actual time=0.140..0.232 rows=4 loops=1)
  ->  Append  (cost=0.00..50.11 rows=7 width=405) (actual time=0.132..0.219 rows=4 loops=1)
        ->  Index Scan using idx_paris_tags on paris  (cost=0.00..8.27 rows=1 width=450) (actual time=0.009..0.009 rows=0 loops=1)
              Index Cond: (tags ? 'tourism'::text)
              Filter: (ar_num = 8)
        ->  Seq Scan on paris_linestrings paris  (cost=0.00..11.80 rows=1 width=450) (actual time=0.001..0.001 rows=0 loops=1)
              Filter: ((tags ? 'tourism'::text) AND (ar_num = 8))
        ->  Index Scan using idx_paris_points_tags on paris_points paris  (cost=0.00..8.27 rows=1 width=450)
        		(actual time=0.003..0.003 rows=0 loops=1)
              Index Cond: (tags ? 'tourism'::text)
              Filter: (ar_num = 8)
        ->  Index Scan using idx_paris_polygons_tags on paris_polygons paris  (cost=0.00..8.27 rows=1 width=450)
        		(actual time=0.002..0.002 rows=0 loops=1)
              Index Cond: (tags ? 'tourism'::text)
              Filter: (ar_num = 8)
        ->  Seq Scan on paris_linestrings_ar_08 paris  (cost=0.00..7.27 rows=1 width=513) (actual time=0.104..0.104 rows=0 loops=1)
              Filter: ((tags ? 'tourism'::text) AND (ar_num = 8))
        ->  Seq Scan on paris_points_ar_08 paris  (cost=0.00..5.16 rows=1 width=72) (actual time=0.009..0.085 rows=4 loops=1)
              Filter: ((tags ? 'tourism'::text) AND (ar_num = 8))
        ->  Seq Scan on paris_polygons_ar_08 paris  (cost=0.00..1.08 rows=1 width=450) (actual time=0.007..0.007 rows=0 loops=1)
              Filter: ((tags ? 'tourism'::text) AND (ar_num = 8))
Total runtime: 1.314 ms
The PgAdmin III Graphical Explain Plan
JSON Format Explain Plan
--JSON --
EXPLAIN (ANALYZE true, COSTS true, FORMAT json)
SELECT feature_name, tags->'tourism' As tourism_type FROM ch03.paris
    WHERE ar_num = 8 AND tags?'tourism';
[
  {
    "Plan": {
      "Node Type": "Result",
      "Startup Cost": 0.00,
      "Total Cost": 50.13,
      "Plan Rows": 7,
      "Plan Width": 405,
      "Actual Startup Time": 0.139,
      "Actual Total Time": 0.231,
      "Actual Rows": 4,
      "Actual Loops": 1,
      "Plans": [
        {
          "Node Type": "Append",
          "Parent Relationship": "Outer",
          "Startup Cost": 0.00,
          "Total Cost": 50.11,
          "Plan Rows": 7,
          "Plan Width": 405,
          "Actual Startup Time": 0.131,
          "Actual Total Time": 0.218,
          "Actual Rows": 4,
          "Actual Loops": 1,
          "Plans": [
            {
              "Node Type": "Index Scan",
              "Parent Relationship": "Member",
              "Scan Direction": "NoMovement",
              "Index Name": "idx_paris_tags",
              "Relation Name": "paris",
              "Alias": "paris",
              "Startup Cost": 0.00,
              "Total Cost": 8.27,
              "Plan Rows": 1,
              "Plan Width": 450,
              "Actual Startup Time": 0.009,
              "Actual Total Time": 0.009,
              "Actual Rows": 0,
              "Actual Loops": 1,
              "Index Cond": "(tags ? 'tourism'::text)",
              "Filter": "(ar_num = 8)"
            },
            {
              "Node Type": "Seq Scan",
              "Parent Relationship": "Member",
              "Relation Name": "paris_linestrings",
              "Alias": "paris",
              "Startup Cost": 0.00,
              "Total Cost": 11.80,
              "Plan Rows": 1,
              "Plan Width": 450,
              "Actual Startup Time": 0.001,
              "Actual Total Time": 0.001,
              "Actual Rows": 0,
              "Actual Loops": 1,
              "Filter": "((tags ? 'tourism'::text) AND (ar_num = 8))"
            },
            {
              "Node Type": "Index Scan",
              "Parent Relationship": "Member",
              "Scan Direction": "NoMovement",
              "Index Name": "idx_paris_points_tags",
              "Relation Name": "paris_points",
              "Alias": "paris",
              "Startup Cost": 0.00,
              "Total Cost": 8.27,
              "Plan Rows": 1,
              "Plan Width": 450,
              "Actual Startup Time": 0.003,
              "Actual Total Time": 0.003,
              "Actual Rows": 0,
              "Actual Loops": 1,
              "Index Cond": "(tags ? 'tourism'::text)",
              "Filter": "(ar_num = 8)"
            },
            {
              "Node Type": "Index Scan",
              "Parent Relationship": "Member",
              "Scan Direction": "NoMovement",
              "Index Name": "idx_paris_polygons_tags",
              "Relation Name": "paris_polygons",
              "Alias": "paris",
              "Startup Cost": 0.00,
              "Total Cost": 8.27,
              "Plan Rows": 1,
              "Plan Width": 450,
              "Actual Startup Time": 0.002,
              "Actual Total Time": 0.002,
              "Actual Rows": 0,
              "Actual Loops": 1,
              "Index Cond": "(tags ? 'tourism'::text)",
              "Filter": "(ar_num = 8)"
            },
            {
              "Node Type": "Seq Scan",
              "Parent Relationship": "Member",
              "Relation Name": "paris_linestrings_ar_08",
              "Alias": "paris",
              "Startup Cost": 0.00,
              "Total Cost": 7.27,
              "Plan Rows": 1,
              "Plan Width": 513,
              "Actual Startup Time": 0.103,
              "Actual Total Time": 0.103,
              "Actual Rows": 0,
              "Actual Loops": 1,
              "Filter": "((tags ? 'tourism'::text) AND (ar_num = 8))"
            },
            {
              "Node Type": "Seq Scan",
              "Parent Relationship": "Member",
              "Relation Name": "paris_points_ar_08",
              "Alias": "paris",
              "Startup Cost": 0.00,
              "Total Cost": 5.16,
              "Plan Rows": 1,
              "Plan Width": 72,
              "Actual Startup Time": 0.009,
              "Actual Total Time": 0.085,
              "Actual Rows": 4,
              "Actual Loops": 1,
              "Filter": "((tags ? 'tourism'::text) AND (ar_num = 8))"
            },
            {
              "Node Type": "Seq Scan",
              "Parent Relationship": "Member",
              "Relation Name": "paris_polygons_ar_08",
              "Alias": "paris",
              "Startup Cost": 0.00,
              "Total Cost": 1.08,
              "Plan Rows": 1,
              "Plan Width": 450,
              "Actual Startup Time": 0.007,
              "Actual Total Time": 0.007,
              "Actual Rows": 0,
              "Actual Loops": 1,
              "Filter": "((tags ? 'tourism'::text) AND (ar_num = 8))"
            }
          ]
        }
      ]
    },
    "Triggers": [
    ],
    "Total Runtime": 1.238
  }
]
XML Format Explain Plan
The XML in itself is very useful because you can navigate it with XML viewers, or the built-in XML viewers in IE and Firefox. They are also fairly easy to stylize with with XSL.
-- XML --
EXPLAIN (ANALYZE true, COSTS true, FORMAT xml)
SELECT feature_name, tags->'tourism' As tourism_type FROM ch03.paris
    WHERE ar_num = 8 AND tags?'tourism';
<explain xmlns="http://www.postgresql.org/2009/explain">
  <Query>
    <Plan>
      <Node-Type>Result</Node-Type>
      <Startup-Cost>0.00</Startup-Cost>
      <Total-Cost>50.13</Total-Cost>
      <Plan-Rows>7</Plan-Rows>
      <Plan-Width>405</Plan-Width>
      <Actual-Startup-Time>0.136</Actual-Startup-Time>
      <Actual-Total-Time>0.230</Actual-Total-Time>
      <Actual-Rows>4</Actual-Rows>
      <Actual-Loops>1</Actual-Loops>
      <Plans>
        <Plan>
          <Node-Type>Append</Node-Type>
          <Parent-Relationship>Outer</Parent-Relationship>
          <Startup-Cost>0.00</Startup-Cost>
          <Total-Cost>50.11</Total-Cost>
          <Plan-Rows>7</Plan-Rows>
          <Plan-Width>405</Plan-Width>
          <Actual-Startup-Time>0.128</Actual-Startup-Time>
          <Actual-Total-Time>0.217</Actual-Total-Time>
          <Actual-Rows>4</Actual-Rows>
          <Actual-Loops>1</Actual-Loops>
          <Plans>
            <Plan>
              <Node-Type>Index Scan</Node-Type>
              <Parent-Relationship>Member</Parent-Relationship>
              <Scan-Direction>NoMovement</Scan-Direction>
              <Index-Name>idx_paris_tags</Index-Name>
              <Relation-Name>paris</Relation-Name>
              <Alias>paris</Alias>
              <Startup-Cost>0.00</Startup-Cost>
              <Total-Cost>8.27</Total-Cost>
              <Plan-Rows>1</Plan-Rows>
              <Plan-Width>450</Plan-Width>
              <Actual-Startup-Time>0.008</Actual-Startup-Time>
              <Actual-Total-Time>0.008</Actual-Total-Time>
              <Actual-Rows>0</Actual-Rows>
              <Actual-Loops>1</Actual-Loops>
              <Index-Cond>(tags ? 'tourism'::text)</Index-Cond>
              <Filter>(ar_num = 8)</Filter>
            </Plan>
            <Plan>
              <Node-Type>Seq Scan</Node-Type>
              <Parent-Relationship>Member</Parent-Relationship>
              <Relation-Name>paris_linestrings</Relation-Name>
              <Alias>paris</Alias>
              <Startup-Cost>0.00</Startup-Cost>
              <Total-Cost>11.80</Total-Cost>
              <Plan-Rows>1</Plan-Rows>
              <Plan-Width>450</Plan-Width>
              <Actual-Startup-Time>0.001</Actual-Startup-Time>
              <Actual-Total-Time>0.001</Actual-Total-Time>
              <Actual-Rows>0</Actual-Rows>
              <Actual-Loops>1</Actual-Loops>
              <Filter>((tags ? 'tourism'::text) AND (ar_num = 8))</Filter>
            </Plan>
            <Plan>
              <Node-Type>Index Scan</Node-Type>
              <Parent-Relationship>Member</Parent-Relationship>
              <Scan-Direction>NoMovement</Scan-Direction>
              <Index-Name>idx_paris_points_tags</Index-Name>
              <Relation-Name>paris_points</Relation-Name>
              <Alias>paris</Alias>
              <Startup-Cost>0.00</Startup-Cost>
              <Total-Cost>8.27</Total-Cost>
              <Plan-Rows>1</Plan-Rows>
              <Plan-Width>450</Plan-Width>
              <Actual-Startup-Time>0.002</Actual-Startup-Time>
              <Actual-Total-Time>0.002</Actual-Total-Time>
              <Actual-Rows>0</Actual-Rows>
              <Actual-Loops>1</Actual-Loops>
              <Index-Cond>(tags ? 'tourism'::text)</Index-Cond>
              <Filter>(ar_num = 8)</Filter>
            </Plan>
            <Plan>
              <Node-Type>Index Scan</Node-Type>
              <Parent-Relationship>Member</Parent-Relationship>
              <Scan-Direction>NoMovement</Scan-Direction>
              <Index-Name>idx_paris_polygons_tags</Index-Name>
              <Relation-Name>paris_polygons</Relation-Name>
              <Alias>paris</Alias>
              <Startup-Cost>0.00</Startup-Cost>
              <Total-Cost>8.27</Total-Cost>
              <Plan-Rows>1</Plan-Rows>
              <Plan-Width>450</Plan-Width>
              <Actual-Startup-Time>0.002</Actual-Startup-Time>
              <Actual-Total-Time>0.002</Actual-Total-Time>
              <Actual-Rows>0</Actual-Rows>
              <Actual-Loops>1</Actual-Loops>
              <Index-Cond>(tags ? 'tourism'::text)</Index-Cond>
              <Filter>(ar_num = 8)</Filter>
            </Plan>
            <Plan>
              <Node-Type>Seq Scan</Node-Type>
              <Parent-Relationship>Member</Parent-Relationship>
              <Relation-Name>paris_linestrings_ar_08</Relation-Name>
              <Alias>paris</Alias>
              <Startup-Cost>0.00</Startup-Cost>
              <Total-Cost>7.27</Total-Cost>
              <Plan-Rows>1</Plan-Rows>
              <Plan-Width>513</Plan-Width>
              <Actual-Startup-Time>0.102</Actual-Startup-Time>
              <Actual-Total-Time>0.102</Actual-Total-Time>
              <Actual-Rows>0</Actual-Rows>
              <Actual-Loops>1</Actual-Loops>
              <Filter>((tags ? 'tourism'::text) AND (ar_num = 8))</Filter>
            </Plan>
            <Plan>
              <Node-Type>Seq Scan</Node-Type>
              <Parent-Relationship>Member</Parent-Relationship>
              <Relation-Name>paris_points_ar_08</Relation-Name>
              <Alias>paris</Alias>
              <Startup-Cost>0.00</Startup-Cost>
              <Total-Cost>5.16</Total-Cost>
              <Plan-Rows>1</Plan-Rows>
              <Plan-Width>72</Plan-Width>
              <Actual-Startup-Time>0.008</Actual-Startup-Time>
              <Actual-Total-Time>0.086</Actual-Total-Time>
              <Actual-Rows>4</Actual-Rows>
              <Actual-Loops>1</Actual-Loops>
              <Filter>((tags ? 'tourism'::text) AND (ar_num = 8))</Filter>
            </Plan>
            <Plan>
              <Node-Type>Seq Scan</Node-Type>
              <Parent-Relationship>Member</Parent-Relationship>
              <Relation-Name>paris_polygons_ar_08</Relation-Name>
              <Alias>paris</Alias>
              <Startup-Cost>0.00</Startup-Cost>
              <Total-Cost>1.08</Total-Cost>
              <Plan-Rows>1</Plan-Rows>
              <Plan-Width>450</Plan-Width>
              <Actual-Startup-Time>0.007</Actual-Startup-Time>
              <Actual-Total-Time>0.007</Actual-Total-Time>
              <Actual-Rows>0</Actual-Rows>
              <Actual-Loops>1</Actual-Loops>
              <Filter>((tags ? 'tourism'::text) AND (ar_num = 8))</Filter>
            </Plan>
          </Plans>
        </Plan>
      </Plans>
    </Plan>
    <Triggers>
    </Triggers>
    <Total-Runtime>1.208</Total-Runtime>
  </Query>
</explain>
YAML Format Explain Plan
-- YAML --
EXPLAIN (ANALYZE true, COSTS true, FORMAT yaml)
SELECT feature_name, tags->'tourism' As tourism_type FROM ch03.paris
    WHERE ar_num = 8 AND tags?'tourism';
- Plan:
    Node Type: "Result"
    Startup Cost: 0.00
    Total Cost: 50.13
    Plan Rows: 7
    Plan Width: 405
    Actual Startup Time: 0.139
    Actual Total Time: 0.232
    Actual Rows: 4
    Actual Loops: 1
    Plans:
      - Node Type: "Append"
        Parent Relationship: "Outer"
        Startup Cost: 0.00
        Total Cost: 50.11
        Plan Rows: 7
        Plan Width: 405
        Actual Startup Time: 0.131
        Actual Total Time: 0.219
        Actual Rows: 4
        Actual Loops: 1
        Plans:
          - Node Type: "Index Scan"
            Parent Relationship: "Member"
            Scan Direction: "NoMovement"
            Index Name: "idx_paris_tags"
            Relation Name: "paris"
            Alias: "paris"
            Startup Cost: 0.00
            Total Cost: 8.27
            Plan Rows: 1
            Plan Width: 450
            Actual Startup Time: 0.009
            Actual Total Time: 0.009
            Actual Rows: 0
            Actual Loops: 1
            Index Cond: "(tags ? 'tourism'::text)"
            Filter: "(ar_num = 8)"
          - Node Type: "Seq Scan"
            Parent Relationship: "Member"
            Relation Name: "paris_linestrings"
            Alias: "paris"
            Startup Cost: 0.00
            Total Cost: 11.80
            Plan Rows: 1
            Plan Width: 450
            Actual Startup Time: 0.001
            Actual Total Time: 0.001
            Actual Rows: 0
            Actual Loops: 1
            Filter: "((tags ? 'tourism'::text) AND (ar_num = 8))"
          - Node Type: "Index Scan"
            Parent Relationship: "Member"
            Scan Direction: "NoMovement"
            Index Name: "idx_paris_points_tags"
            Relation Name: "paris_points"
            Alias: "paris"
            Startup Cost: 0.00
            Total Cost: 8.27
            Plan Rows: 1
            Plan Width: 450
            Actual Startup Time: 0.002
            Actual Total Time: 0.002
            Actual Rows: 0
            Actual Loops: 1
            Index Cond: "(tags ? 'tourism'::text)"
            Filter: "(ar_num = 8)"
          - Node Type: "Index Scan"
            Parent Relationship: "Member"
            Scan Direction: "NoMovement"
            Index Name: "idx_paris_polygons_tags"
            Relation Name: "paris_polygons"
            Alias: "paris"
            Startup Cost: 0.00
            Total Cost: 8.27
            Plan Rows: 1
            Plan Width: 450
            Actual Startup Time: 0.002
            Actual Total Time: 0.002
            Actual Rows: 0
            Actual Loops: 1
            Index Cond: "(tags ? 'tourism'::text)"
            Filter: "(ar_num = 8)"
          - Node Type: "Seq Scan"
            Parent Relationship: "Member"
            Relation Name: "paris_linestrings_ar_08"
            Alias: "paris"
            Startup Cost: 0.00
            Total Cost: 7.27
            Plan Rows: 1
            Plan Width: 513
            Actual Startup Time: 0.104
            Actual Total Time: 0.104
            Actual Rows: 0
            Actual Loops: 1
            Filter: "((tags ? 'tourism'::text) AND (ar_num = 8))"
          - Node Type: "Seq Scan"
            Parent Relationship: "Member"
            Relation Name: "paris_points_ar_08"
            Alias: "paris"
            Startup Cost: 0.00
            Total Cost: 5.16
            Plan Rows: 1
            Plan Width: 72
            Actual Startup Time: 0.008
            Actual Total Time: 0.086
            Actual Rows: 4
            Actual Loops: 1
            Filter: "((tags ? 'tourism'::text) AND (ar_num = 8))"
          - Node Type: "Seq Scan"
            Parent Relationship: "Member"
            Relation Name: "paris_polygons_ar_08"
            Alias: "paris"
            Startup Cost: 0.00
            Total Cost: 1.08
            Plan Rows: 1
            Plan Width: 450
            Actual Startup Time: 0.007
            Actual Total Time: 0.007
            Actual Rows: 0
            Actual Loops: 1
            Filter: "((tags ? 'tourism'::text) AND (ar_num = 8))"
  Triggers:
  Total Runtime: 1.301
Stay tuned for our next parts when we demonstrate how to add a little spice to these with some basic web scripting techniques.
Using PostgreSQL Extensions
Fuzzy string matching with Trigram and Trigraphs Intermediate
In an earlier article Where is Soundex and other Fuzzy string things we covered the PostgreSQL contrib module fuzzstrmatch which contains the very popular function soundex that is found in other popular relational databases. We also covered the more powerful levenshtein distance, metaphone and dmetaphone functions included in fuzzstrmatch, but rarely found in other relational databases.
As far as fuzzy string matching goes, PostgreSQL has other functions up its sleeves. This time we will cover the contrib module pg_trgm which was introduced in PostgreSQL 8.3. pgtrgm uses a concept called trigrams for doing string comparisons. The pg_trgm module has several functions and gist/gin operators. Like other contrib modules, you just need to run the /share/contrib/pg_trgm.sql file packaged in your PostgreSQL install to enable it in your database.
For this set of exercises, we'll use trigrams to compare words using the same set of data we tested with soundex and metaphones. For the next set of exercises, we will be using the places dataset we created in Importing Fixed width data into PostgreSQL with just PSQL.
The most useful are the similarity function and the % operator. The % operator allows for using a GIST/GIN index and the similarity function allows for narrowing your filter similar to what levenshtein did for us in fuzzstrmatch.
What do PostgreSQL trigrams look like
A text string is composed of n number of trigrams which in PostgreSQL is displayed as an array of 3 character text values stored which consist of all 3 character consecutive groups that can be formed from the text. You can inspect this with the show_trgm function.
It's probably easiest to get a sense of what they are by looking at some. Below are some texts in random order with accompanying trigrams for each text. We chose only locations of less than 10 characters so that we could easily display the trigrams.
One of the simplest and my favorite is that for Leo.
SELECT show_trgm('Leo');
Which yields:
{" l"," le","eo ",leo}
SELECT loc_name, show_trgm(loc_name) As tg
FROM places
WHERE length(loc_name) < 10
ORDER BY random() limit 10;


-- Result is much more appealing
 loc_name  |                          tg
-----------+-------------------------------------------------------
 Spade CDP | {"  c","  s"," cd"," sp",ade,cdp,"de ","dp ",pad,spa}
 Espy CDP  | {"  c","  e"," cd"," es",cdp,"dp ",esp,"py ",spy}
 Paia CDP  | {"  c","  p"," cd"," pa",aia,cdp,"dp ","ia ",pai}
 Keys CDP  | {"  c","  k"," cd"," ke",cdp,"dp ",eys,key,"ys "}
 Ulen town | {"  t","  u"," to"," ul","en ",len,own,tow,ule,"wn "}
 Lead city | {"  c","  l"," ci"," le","ad ",cit,ead,ity,lea,"ty "}
 Wray city | {"  c","  w"," ci"," wr","ay ",cit,ity,ray,"ty ",wra}
 Mona town | {"  m","  t"," mo"," to",mon,"na ",ona,own,tow,"wn "}
 Derby CDP | {"  c","  d"," cd"," de","by ",cdp,der,"dp ",erb,rby}
 Sells CDP | {"  c","  s"," cd"," se",cdp,"dp ",ell,lls,"ls ",sel}
Building GIST/GIN indexes for trigram
Before we can take full advantage of these functions and opertors, we need to put an index on our text field. pgtrgm supports both GIST and GIN very similar in concept to the TSearch. The main difference between the two indexes is that GIST is slower to query, but faster to build and GIN gives better search performance but slower to build. for our relatively small dataset of 35,000 some odd records, the performance between the two is about the same and took between 1 and 2 seconds to index all entries, with no real noticeable difference between using GIST or GIN in index speed on our PostgreSQL 9.0 beta install.
CREATE INDEX idx_places_trgm_gist_loc_name
   ON places USING gist (loc_name gist_trgm_ops);

-- we chose to build with gin
CREATE INDEX idx_places_trgm_gin_loc_name
   ON places USING gin(loc_name gin_trgm_ops);
Doing comparisons
Just like soundex, the % operator and similarity functions are case insensitive. The pg_trigram approach seems especially good at catching misspellings and allows you to easily control your tolerance for a misspelling. It doesn't suffer from the same issues fuzzystrmatch does when dealing with unicode characters, but will also not catch similar pronunciations as effectively.
Now to use we can use the % operator in conjunction with the similarity function or by itself. The similarity function will always return a number between 0 and 1 which is a measure of how similar two text strings are ; with 1 having same set of trigrams.
SELECT loc_name, similarity(loc_name, 'abeville') As sim_score
FROM places
WHERE loc_name % 'abeville' AND similarity(loc_name, 'abeville') > 0.35
ORDER BY loc_name;


-- output --
    loc_name    | sim_score
----------------+-----------
 Abbeville city |       0.5
 Abbeville city |       0.5
 Abbeville city |       0.5
 Abbeville city |       0.5
 Abbeville town |       0.5
Let us try a similar example to what we tried with soundex.
SELECT loc_name, similarity(loc_name, 'rising sun') As sim_score
FROM places
WHERE loc_name % 'rising sun' AND similarity(loc_name, 'rising sun') > 0.35
ORDER BY similarity(loc_name, 'rising sun') DESC, loc_name;


        loc_name        | sim_score
------------------------+-----------
 Rising Sun city        |    0.6875
 Rising Sun town        |    0.6875
 Rising Sun-Lebanon CDP |  0.478261
 Rising Star town       |       0.4
 Risingsun village      |  0.380952
Controlling default weights
What would happen if we used % without the added similarity filter? It would behave as if the similarity filter were set at the default weight. To see the default weight we use this statement.
SELECT show_limit();

--output --
0.3
You can lower or increase the weight with set_limit();
As mentioned. Trigrams are good for catching misspellings, but not as good as soundex and dmetaphone for catching same sound words spelled differently. To demonstrate, if we picked our El Cajon example from before where our dmetaphone excelled and return El Cajon.
SELECT loc_name, similarity(loc_name, 'Elle Cahon') As sim_score
FROM places
WHERE loc_name % 'Elle Cahon'
ORDER BY similarity(loc_name, 'Elle Cahon') DESC, loc_name;


    loc_name    | sim_score
----------------+-----------
 Ellenton CDP   |  0.333333
 Ellaville city |       0.3
 Ellendale city |       0.3
 Ellendale city |       0.3
It is obviously not as good as our dmetaphone.
Using PostgreSQL Extensions
Using LTree to Represent and Query Hierarchy and Tree Structures Intermediate
PostgreSQL offers several options for displaying and querying tree like structures. In Using Recursive Common Table Expressions (CTE) to represent tree structures we demonstrated how to use common table expressions to display a tree like structure. Common Table Expressions required PostgreSQL 8.4 and above but was fairly ANSI standards compliant. In addition to that approach you have the option of using recursive functions. There is yet another common approach for this which is specific to PostgreSQL. This is using the ltree contrib datatype that has been supported for sometime in PostgreSQL. For one of our recent projects, we chose ltree over the other approaches because the performance is much better when you need to do ad-hoc queries over the tree since it can take advantage of btree and gist indexes and also has built-in tree query expressions that make ad-hoc queries simpler to do; similar in concept to the tsearch query syntax for querying text.
In this article we'll demonstrate how to use ltree and along the way also show the PostgreSQL 9.0 new features conditional triggers and ordered aggregates.
Why use ltree?
The upsides are that:
- It has been supported for some time in PostgreSQL so can be used even in older versions such as PostgreSQL 8.1/8.2
- It will be generally faster than using a recursive CTE or recursive function that constantly needs to recalculate the branching
- Has built in query syntax and operators specifically designed for querying and navigating trees
The main downside of the ltree approach is that the tree structure needs to be maintained usually as an extra field to gain all the benefits it offers. This you can do fairly easily using triggers.
Support for Trees and Recursive structures in other vendor databases
The other downside is that ltree datatype is not as portable across different database vendor products, though you could simulate the behavior in other databases by maintaining the dot representation as a text field with a simple index and do basic text queries for other databases if portability is a concern.
Some other databases have similar types. For examples SQL Server 2008 has a datatype called HierarchyID which serves the same purpose as ltree but with different syntax. An example of the SQL Server hierarchyid type can be found in Introduction to SQL Server 2008 HierarchyID. It uses path '/' notation for display instead of ltree '.' notation for display. SQL Server also uses object oriented methods for navigation as opposed to plain old functions and operators that ltree employs. On the plus side, PostgreSQL ltree syntax is much more terse than SQL Server's HierarcyID methods but on the downside is more cryptic looking.
As a side note -- all the big three proprietary enterprise databases (Oracle 11G R2, IBM Db2, SQL Server 2005/2008) support recursive common table expressions. Prior versions of Oracle only support Oracle proprietary CONNECT BY syntax which in some cases is more flexible than the CTE standard.
To our knowledge the only Open source databases that support recursive common table expressions are PostgreSQL 8.4+ and Firebird 2.1+. Firebird's CTEs are explaind here.
Ltree at work
For these next exercises, we will use the same dataset we used on our earlier article on CTEs.
Installing ltree type
Before we can use the ltree datatype, we need to install it by running the ltree.sql in /share/contrib/ltree.sql. Once that is done we will create our table as before, but with an additional column to hold the node path. We also add two indexes to improve speed of queries.
ltree at work
CREATE TABLE supplyitem(si_id integer PRIMARY KEY, si_parentid integer, si_item varchar(100), node_path ltree);
CREATE UNIQUE INDEX idx_supplyitem_node_path_btree_idx ON supplyitem USING btree(node_path);
CREATE INDEX idx_supplyitem_node_path_gist_idx ON supplyitem USING gist(node_path);
To maintain the node_path value, we opted to use triggers so that we can insert data as easily as we did before. The below code creates a trigger and binds it to the table.
The key operator we are using is @> which when use a @> b returns a boolean whether b is a child or equal to a. Note there are many more operators and a rich query syntax we encourage you to explore in the official PostgreSQL ltree documentation.
CREATE OR REPLACE FUNCTION get_calculated_si_node_path(param_si_id integer)
  RETURNS ltree AS
$$
SELECT  CASE WHEN s.si_parentid IS NULL THEN s.si_id::text::ltree
            ELSE get_calculated_si_node_path(s.si_parentid)  || s.si_id::text END
    FROM supplyitem As s
    WHERE s.si_id = $1;
$$
  LANGUAGE sql;


/** trigger to maintain node when parent or item id changes or record is added
    We revised this since the first version because the order of the short-circuiting is not predictable so TG_OP needs a nested IF.
    Also some other minor simplifications
**/
CREATE OR REPLACE FUNCTION trig_update_si_node_path() RETURNS trigger AS
$$
BEGIN
  IF TG_OP = 'UPDATE' THEN
        IF (COALESCE(OLD.si_parentid,0) != COALESCE(NEW.si_parentid,0)  OR  NEW.si_id != OLD.si_id) THEN
            -- update all nodes that are children of this one including this one
            UPDATE supplyitem SET node_path = get_calculated_si_node_path(si_id)
                WHERE OLD.node_path  @> supplyitem.node_path;
        END IF;
  ELSIF TG_OP = 'INSERT' THEN
        UPDATE supplyitem SET node_path = get_calculated_si_node_path(NEW.si_id) WHERE supplyitem.si_id = NEW.si_id;
  END IF;

  RETURN NEW;
END
$$
LANGUAGE 'plpgsql' VOLATILE;

/** for postgreSQL 9.0 -- you can use this syntax to save unnecessary check of trigger function **/
CREATE TRIGGER trig01_update_si_node_path AFTER INSERT OR UPDATE OF si_id, si_parentid
   ON supplyitem FOR EACH ROW
   EXECUTE PROCEDURE trig_update_si_node_path();

/** pre - postgreSQL 9.0 -- have to use this syntax **/
CREATE TRIGGER trig01_update_si_node_path AFTER INSERT OR UPDATE
   ON supplyitem FOR EACH ROW
   EXECUTE PROCEDURE trig_update_si_node_path();
Now that we have the triggers in place, we can insert the data as we did before. Note that when we select, the trigger has filled in the node_path for us.
-- insert the data --
--load up the table (multirow constructor introduced in 8.2)
INSERT INTO supplyitem(si_id,si_parentid, si_item)
VALUES (1, NULL, 'Paper'),
(2,1, 'Recycled'),
(3,2, '20 lb'),
(4,2, '40 lb'),
(5,1, 'Non-Recycled'),
(6,5, '20 lb'),
(7,5, '40 lb'),
(8,5, 'Scraps');


SELECT si_id, si_item, si_parentid, node_path
    FROM supplyitem;


-- result looks like --
 si_id |   si_item    | si_parentid | node_path
-------+--------------+-------------+-----------
     1 | Paper        |             | 1
     2 | Recycled     |           1 | 1.2
     3 | 20 lb        |           2 | 1.2.3
     4 | 40 lb        |           2 | 1.2.4
     5 | Non-Recycled |           1 | 1.5
     6 | 20 lb        |           5 | 1.5.6
     7 | 40 lb        |           5 | 1.5.7
     8 | Scraps       |           5 | 1.5.8
To produce the same results as we did in our earlier article we have a couple of options. For PostgreSQL 9.0 we can use ordered aggs or the old ARRAY syntax and for older versions we use ARRAY subselect syntax.
-- use a self join to find all the ancestors
-- of selected nodes and concat and order them by ancestry level

-- 9.0 syntax
SELECT s.si_id, array_to_string(array_agg(a.si_item ORDER BY a.node_path), '->') As si_item_fullname
FROM supplyitem As s INNER JOIN supplyitem As a
    ON (a.node_path @> s.node_path)
GROUP BY s.si_id, s.node_path, s.si_item
ORDER BY si_item_fullname;

-- Pre 9.0 syntax (can use for 9.0 as well)
SELECT s.si_id, array_to_string(
            ARRAY(SELECT a.si_item FROM supplyitem As a WHERE a.node_path @> s.node_path
                                ORDER BY a.node_path)
                                        ,
                        '->') As si_item_fullname
FROM supplyitem As s
ORDER BY si_item_fullname;


-- output of both looks like our old recursive
si_id |      si_item_fullname
------+-----------------------------
    1 | Paper
    5 | Paper->Non-Recycled
    6 | Paper->Non-Recycled->20 lb
    7 | Paper->Non-Recycled->40 lb
    8 | Paper->Non-Recycled->Scraps
    2 | Paper->Recycled
    3 | Paper->Recycled->20 lb
    4 | Paper->Recycled->40 lb
To test the updating, we will make Recyled a higher level (not child of Paper). If this is working properly, it should update all the child records as well.
-- Detached recycled from Paper --
UPDATE supplyitem SET si_parentid = null where si_id = 2;


-- when we rerun our prior select queries we get
-- select from table

 si_id |   si_item    | si_parentid | node_path
-------+--------------+-------------+-----------
     1 | Paper        |             | 1
     5 | Non-Recycled |           1 | 1.5
     6 | 20 lb        |           5 | 1.5.6
     7 | 40 lb        |           5 | 1.5.7
     8 | Scraps       |           5 | 1.5.8
     2 | Recycled     |             | 2
     3 | 20 lb        |           2 | 2.3
     4 | 40 lb        |           2 | 2.4

-- pretty display query
si_id |      si_item_fullname
------+-----------------------------
    1 | Paper
    5 | Paper->Non-Recycled
    6 | Paper->Non-Recycled->20 lb
    7 | Paper->Non-Recycled->40 lb
    8 | Paper->Non-Recycled->Scraps
    2 | Recycled
    3 | Recycled->20 lb
4 | Recycled->40 lbApplication Development
Explain Plans PostgreSQL 9.0 - Part 2: JSON and JQuery Plan Viewer Intermediate
In part 1 of this series on PostgreSQL 9.0 planner outputs, we demonstrated how to render explain plans in YAML, JSON, and XML using the new explain features in PostgreSQL 9.0. In this second part, we'll demonstrate how to build a user interface that allows you input a JSON formatted explain plan and have it render into a printable, navigateable display using JQuery, javascript and a little bit of HTML coding. In part 3 we'll do something similar using XML and XSLT programming.
For those who aren't familiar with JQuery, it is an MIT licensed javascript library that is fairly light weight and allows you to inspect and change html elements with fairly intuitive syntax, has some nice ajax methods and tools for converting xml/json to native objects that can be manipulated. You can check it out at JQUERY.
We are not experts in JQuery, but from what we have used of it, we really like it and the fact the base package is MIT licensed, fairly light weight and lots of plugins available for it are real pluses.
The most difficult thing I think most people find about reading explain plans is that they are upside down; it starts with a conclusion and backtracks how to arrive at it. Humans by nature think about planning steps from start to finish. In order to make an explain plan understandable to mere mortals, we generally display them upside down or having the child-nodes shown left most. We shall follow that approach.
Our Interface for inputing plans
For this exercise and subsequent exercise, we are going to create a simple web form interface that has a few parts.
- A textarea box for you to paste the JSON/XML/whatever planner output. For first phase we'll just support JSON.
- A button for you to click to render your output in breathtaking icons and colors.
- A text field you can put a cost break point so sub plans with greater cost than specified are highlighted
- A button to toggle planner detail on and off
For those that are impatient, our little interface can be tried here PostgreSQL JSON Explain Plan Viewer. We left a snippet of JSON in the text area for easier testing. That JSON can be replaced with any PostgreSQL Explain Plan JSON output.
You can also download the source code from here
The basic form looks like 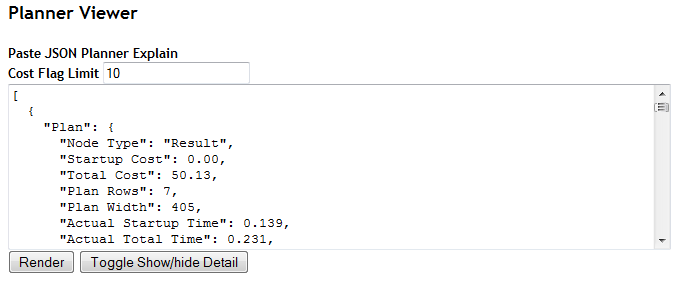
The html for our simple form is shown below
<form id="frmplanner">
    <b>Paste JSON Planner Explain </b><br />
    <b>Cost Flag Limit</b> <input type="text" id="costflag" name="costflag" value="10" />
    <br />
    <textarea id="planneroutput" name="planneroutput" cols="80" rows="10"></textarea><br />
    <input type="button" id="cmdrender" name="cmdrender" value="Render" onclick="drawPlan()"/>
    <input type="button" value="Toggle Show/hide Detail" onclick="toggleDetail()" />
</form>
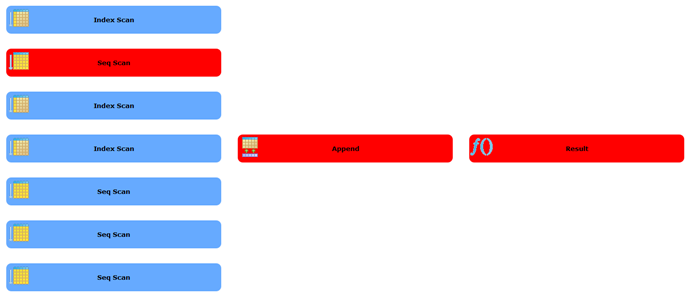
The breathtaking visual plan
Now we come to the harder part of rendering our mouth watering explain plan view. For this piece we have chosen to use JQuery and a JQuery plugin called corner plugin, to get some stylistic rouned corners.
Since we are lazy programmers who lack any artistic ability, we borrowed some of the images used for explain plans from PgAdmin III project. The problem with borrowing those icons, is that we needed them in PNG or JPG format, but PgAdmin source code has them in xpm format in the \include\images folder of the project.
ImageMagick, another great Apache style licensed open source toolkit, came to our rescue to convert XPM -> PNG. The trick we used was to use ImageMagick mogrify commandline tool.
mogrify -format png *.xpm
When we are done with all our programming, our rendered plan will look like this (when detail is hidden):
Nodes will look like below when expanded. We only show 2 in this picture since it takes up a lot of space.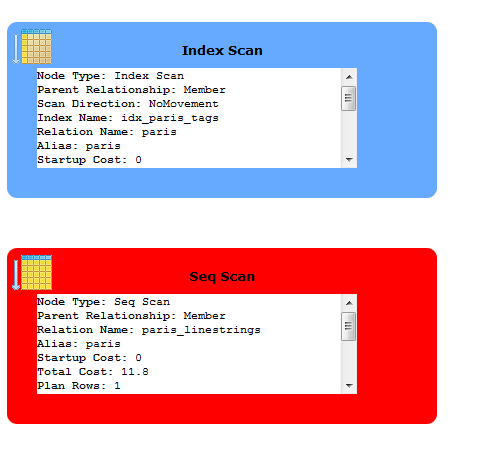
The JQuery secret sauce
The key elements for unraveling the JSON plan are:
- Use JQuery's Parse JSON function to convert to Javascript objects.
var obj = jQuery.parseJSON($('#planneroutput').val()); - Have a drawPlan function -- that parses JSON, and then calls a subplan function which recursively calls itself for each plan node that has plans.
- For the detail summary we defined a css class pgplandetail we stylized in the .css file.
- Then we use JQuery's slick ability to apply styles to a whole set of objects with same class -- to hide and unhide detail.
$('.pgplandetail').hide('slow');
The above snippet hides all objects that are of css class pgplandetail. - For the icons we assumed we could get away with going by the icon names (more or less) and they would have names similar to the plans except replacing space with _ and putting an ex in front. This does not often hold true, so you may need to rename the images.
full javascript is shown below
var detailState = 'show'

    function drawPlan(){
        var obj = jQuery.parseJSON($('#planneroutput').val());
        $('#planholder').html("<table id='tblplan'></table>");
        drawSubPlan(obj[0].Plan, '#tblplan', 'plan');
        detailState = 'show'
    }

    function getPlanImg(pgplan) {
        var imgname = "ex_" +  pgplan['Node Type'].replace(' ', '_').toLowerCase()
        if ("Join Type" in pgplan) {
            if ((pgplan['Join Type'] == 'Left' || pgplan['Join Type'] == 'Left')) {
                imgname += "_semi_join"
            }
            else
            if (pgplan['Join Type'] != 'Inner') {
                imgname += pgplan['Join Type'].replace(' ', '_').toLowerCase()
            }
        }
        imgname += ".png"
        return imgname
    }
    function drawSubPlan(pgplan, elid, pname) {
        var curplan;
        var str;
        var dive = $(elid);
        var childpanel;
        /** We insert the cell before so our display goes in opposite direction of the JSON structure **/

        curplan = pname;
        childpanel = pname + 'childs';

        dive.append("<tr><td><table id='"
            + pname + "childs'></table></td><td><div id='"
            + curplan
            + "' class='pgplan' style='background-repeat:no-repeat;background-image:url(images/" + getPlanImg(pgplan) +")'>"
            + pgplan['Node Type']
            + " <br /><div class='pgplandetail'>"
            + getPlanDetail(pgplan)
            + "</div></div></td></tr>")
        dive = $('#' + pname + 'childs');
        $('#' + curplan).corner();
        /** highlingt the plan red if the cost is above our cut off **/
        if (parseFloat(pgplan['Total Cost']) > parseFloat($('#costflag').val())) {
            $('#' + curplan).css('background-color', 'red')
        }
        /** If this plan has sub plans, unravel them **/
        if ("Plans" in pgplan) {
            for (i = 0; i < pgplan.Plans.length; i++) {
                curplan = pname + '_' + i;
                drawSubPlan(pgplan.Plans[i], '#' + childpanel, curplan);
            }
        }
    }

    function getPlanDetail(obj){
        var temp = "";
        if ("Plans" in obj) {
            temp += '<b># sub plans</b>: ' + obj.Plans.length + "<br />";
        }
        for (x in obj){
            if (x != 'Plans'){
                temp += "<b>" + x + "</b>: " + obj[x] + "<br />";
            }
        }

        return temp;

    }

    function toggleDetail(){
        if (detailState == 'show'){
            $('.pgplandetail').hide('slow');
            detailState = 'hide';
        }
        else {
            $('.pgplandetail').show('slow');
            detailState = 'show';
        }
    }